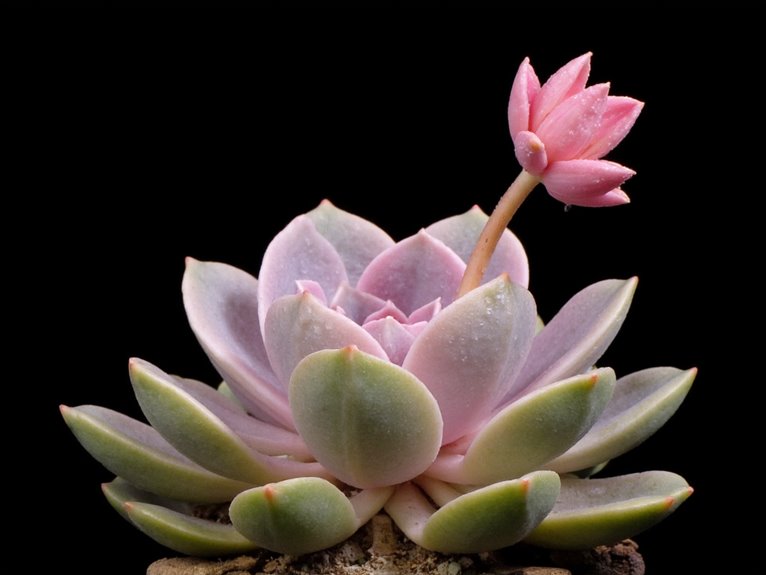
Echeveria Propagation: Leaf and Offset Methods for New Plants
You can propagate Echeveria through either leaf cuttings or offsets, both rewarding methods. For leaves, choose plump, vibrant ones and let them callus for 1-5 days before planting. Offsets should be separated when they’re one-third the mother plant’s size, ideally in spring. Provide bright indirect light, warm temperatures (60-80°F), and well-draining soil to encourage rooting. Be patient – new plants may take weeks to develop roots. With care and attention to these basics, you’ll soon have thriving Echeveria clones growing alongside your existing collection.
Notable Insights
- Choose healthy, plump Echeveria leaves with vibrant color for propagation.
- Let detached leaves callus (dry) for 1–5 days before planting.
- Separate offsets when they’re one-third the mother plant’s size for best results.
- Use well-draining soil and bright indirect light to encourage rooting.
- Patience is essential-new plants may take weeks to develop roots and growth.
Selecting Healthy Leaves for Propagation
How might you choose the perfect leaves for propagation? Focus on leaf characteristics: select fully developed, plump succulent leaves with vibrant color and firm texture. Avoid underdeveloped or wrinkled ones-these lack stored nutrients for new growth. Echeveria’s thick, fleshy leaves are ideal for propagation techniques like detachment and planting. Check that the leaf’s growing point is intact and free from pests or disease. A healthy mother plant with balanced growth increases your chances of success. Propagate during spring to early summer when plants are actively growing. Optimal timing Gently remove leaves using sterilized tools, handling only the base where roots will form. Proper leaf selection lays the foundation for propagation techniques that yield thriving new plants.
The Callusing Process for Leaf Cuttings
When you gently remove a leaf from its parent plant, you’re not just cutting tissue-you’re creating a wound that needs to heal. The callusing process forms a protective layer at the cut site, preventing rot and setting the stage for rooting. Callus timeframes vary from 1–5 days depending on environmental factors like temperature, humidity, and leaf thickness.
Place leaves in a warm, dry area away from direct sunlight to encourage drying without desiccation. Avoid soil contact until callusing is complete.
Check daily for signs of readiness-when the cut end appears slightly hardened and dry, it’s ready to plant. Rushing this step increases rot risks, while patience pays off with healthier new plants.
Setting Up the Perfect Propagation Environment
After the leaf has had time to callus properly, the real work begins with crafting an environment where your new plant can really take hold. Propagation conditions are key-think bright but filtered light, moderate temperatures, and well-draining soil. Let’s break it down:
| Element | Ideal Setting | Notes |
|---|---|---|
| Light | Bright indirect | South or east-facing windows |
| Temperature | 60–80°F daytime | Cool at night (50–65°F) |
| Soil | Cactus mix + perlite | Excellent drainage |
Setting up the right conditions is crucial for successful propagation, ideal air circulation helping to prevent fungal issues while still maintaining enough moisture for the cuttings to root properly.
Propagating Echeveria Through Offsets
A little helper might just be what your echeveria needs to grow its own family. Offsets, or pups, at one-third the mother plant’s size offer best offset viability for successful propagation. Ideal timing arrives mid-spring during active growth-avoid dormant periods when rooting slows and rot risks rise. Gently separate with sterilized tools, prioritizing larger offsets for better chances. Let cuttings dry briefly to form calluses before planting in well-draining soil. Keep pots bright but shaded initially, watering sparingly until rooted. With patience, these helpers transform into thriving clones-perfect for expanding your collection! Consider feeding your newly established plants with liquid fertilizers every 1-2 weeks to support strong growth and vibrant foliage development.
Essential Care Tips for Developing Plants
Although echeveria are relatively low-maintenance, their care requires attention to specific needs. Watering frequency should match the plant’s cycle-only water when soil is dry, and avoid wetting leaves directly. Humidity management keeps them healthy in your home environment. When pests appear on your echeveria, organic pest control options like neem oil provide chemical-free solutions that won’t harm your plants.
| Care Aspect | Tips & Techniques |
|---|---|
| Watering | Let soil fully dry between waterings |
| Light Exposure | Bright indirect light or full sun |
| Pot Requirements | Use pots with drainage holes |
For best growth, maintain temperatures between 60-75°F and humidity around 30-40%. Avoid cold drafts and overwatering to prevent root rot.
Common Challenges in Plant Propagation
Propagation can be tricky even for experienced gardeners, with three major challenges to watch for. Disease management is critical-clean tools and sterile mixes prevent infections from wounds or soil pathogens. Rooting hormones offer help but require careful selection; too little delays growth, while too much risks burning delicate Echeveria cuttings. Environmental control completes the triad: temperatures must stay warm yet stable, with humidity protecting against rapid water loss. By mastering these aspects, you’ll boost your propagation success rate considerably. Remember, patience and attention to detail make even challenging techniques achievable-especially when starting with healthy parent plants.
How Long Does Echeveria Propagation Take?
How long does Echeveria propagation really take you? Both leaf and offset methods have variable timelines depending on conditions. Leaf cuttings need 1-3 days to callus before planting, with roots appearing in 2-4 weeks. Offsets can be separated anytime but thrive best in spring/fall. Propagation timing is influenced by temperature, light, and humidity – cooler nights and brighter days speed rooting success.
| Method | Timeframe for Rooted Plants |
|---|---|
| Leaf Cuttings | 4-6 weeks |
| Offsets | 2-4 weeks |
| Callusing Period | 3-5 days |
| Growth Stage | Weeks to Thrive |
Patience pays off as new rosettes form within weeks. While propagation timing varies, successful rooting often comes with bright light and well-draining soil. For optimal root development, use specialized cactus soil with excellent drainage properties that prevent water retention and support healthy root growth.
Advanced Techniques for Successful Propagation
First, let’s explore how to elevate your echeveria propagation game with strategies that go beyond the basics. Advanced techniques rely on quality propagation tools like succulent-specific scissors and trays for organization, paired with careful attention to environmental factors such as temperature and light. Let the leaves callus properly before planting, and use well-draining soil mixes to avoid waterlogging. Monitor humidity levels closely while ensuring good air circulation around your new plants. By mastering these elements, you’ll boost propagation success rates considerably.
Frequently Asked Questions
Can I Propagate Echeveria From Damaged or Older Leaves?
You can try, but propagation success drops with damaged or older leaves. Their leaf health affects how well they form new plants. Start with the healthiest ones instead.
Is There a Way to Speed up Callusing Artificially?
Yes, you can speed up callusing artificially with a callus accelerator like BA+NAA. Keep humidity low to avoid rot and let cuts air-dry before planting. Warmth above 18℃ helps, too - it’s all about balancing moisture and temperature for quick root growth.
What Container Is Best for Propagation?
Best for propagation are terracotta pots with drainage holes, ya? They let air in and water out, keeping roots dry. Make sure to use well-draining soil too-no soggy spots!
Can Echeveria Be Propagated in Water?
Yes, echeveria can be propagated in water, but it’s riskier than soil. Make sure to use clean water and a shallow container to meet water requirements. Watch for root development closely-roots may take weeks to form, and rot is common if not careful.
Are Some Species Harder to Propagate Than Others?
You might find that certain species are more challenging to propagate – some leaves rot before rooting, while others take weeks or fail entirely. Hybrid varieties often struggle most, with propagation success varying widely based on genetics and care conditions. You may need to try multiple methods for tough species.
On a final note
With patience and the right techniques, propagating echeveria can yield thriving new plants. Whether you’re using leaves or offsets, each method offers a rewarding way to expand your collection. As your plants develop, providing proper care will guarantee their long-term health. Embrace the process, learn from any setbacks, and enjoy watching your greenery grow.