Emergency Plant Surgery: Removing Severely Damaged Plant Parts to Save the Whole Plant
Emergency plant surgery starts with spotting trouble signs like mushrooms at the base or cankers on bark, which mean parts need to go. Grab shears, loppers, and pole pruners for clean cuts-always sterilizing tools between each slice. Focus on removing rotted tissue or dead branches completely, making sure your cuts are smooth and dry to prevent infections. After surgery, water deeply but not too often, and feed with balanced fertilizer once things start healing. Keep an eye out for new growth or signs of stress to guide your care. By taking these steps, you’re giving your plant a fresh start-just remember there’s more to learn about keeping it strong and disease-free.
Notable Insights
- Identify damaged parts through discoloration, cankers, or fungal growth to determine removal areas.
- Use sterilized pruning tools and wear protective gear for safe emergency plant surgery.
- Dispose of cuttings in biohazard bags to prevent pathogen spread and protect the environment.
- Provide deep watering and balanced fertilization after surgery to support recovery.
- Monitor for signs of healing or renewed stress to adjust care strategies accordingly.
Recognizing When Plant Parts Need Immediate Removal
Have you ever noticed a tree’s base sprouting mushrooms or bark turning papery? These are urgent indicators that something beneath the surface is wrong. When you spot discolored, peeling bark or cankers forming on the trunk, it’s time for a structural evaluation of the whole plant. Mushrooms like Armillaria at the base often mean root decay has begun-a silent warning sign. Similarly, dead branches suddenly withering from above suggest irreversible damage deep within the tree’s structure. These visible clues don’t lie; they point to compromised stability and health needing immediate attention before it’s too late.
A critical factor in assessing plant damage is identifying Fungal Indicators, as fungal growth at the base often signals internal rot that can compromise the entire organism. When these signs appear, prompt evaluation by professionals is essential to prevent disease spread and potential hazards.
The Right Tools for Emergency Pruning and Repair
You’ll need the right tools to make clean cuts without hurting your plants-pruning shears for small branches, loppers for thicker ones, and even pole pruners if you’re working high up. Don’t forget to sterilize blades after cutting diseased tissue to keep your garden healthy and safe. The right gear also matters; think gloves, eye protection, and proper storage to keep yourself protected and your tools in top shape. For branches up to 1.5 inches in diameter, bypass loppers like Fiskars models provide the cutting power needed for emergency plant surgery while ensuring clean cuts that promote healing. Choose the appropriate pruner type based on branch thickness for efficient and damage-free pruning.
Precision Cutting Tools
When trees face sudden damage or disease threats, precision cutting tools become gardeners’ lifelines. Modern cutting technology offers pruners, shears, and saws tailored for clean, precise cuts that heal faster and minimize infection risk. Ergonomic design guarantees comfort during emergency repairs, letting you work steady even on shaking branches.
Bypass pruners make neat cuts on live wood while anvil types handle tough dead stems. Micro-blades let you trim delicate flowers or patch up bark wounds without tearing. Carbide-tipped blades stay sharp longer, essential when dealing with storm-damaged limbs.
Surgical Punches provide additional precision for removing damaged tissue or coring affected areas, offering reliable performance in critical plant repair situations. Choose tools with non-slip grips and safety guards for tricky angles. Replaceable blades keep your kit ready for any emergency-whether it’s a fallen branch or a sudden fungal outbreak. Lightweight models reduce hand fatigue during extended emergency pruning sessions, with stainless steel construction providing the rust resistance needed for tools exposed to plant sap and moisture. With the right precision cutting gear, you can save trees’ lives one careful slice at a time.
Sterilization Techniques
First, sterilization isn’t just recommended-it’s essential when dealing with damaged or diseased plants, much like giving your tools a thorough handwash between each cut. Choose from alcohol-based solutions, bleach mixes, soapy water, or alternative cleaners based on your needs and the plant’s condition. Each method has its pros and cons, so pick wisely.
- Isopropyl alcohol kills pathogens quickly without soaking.
- Bleach solutions offer broad protection but require careful handling.
- Warm soapy water cleans before chemical disinfection.
- Lysol or Pine Sol may work as alternatives with caution.
- Always clean tools thoroughly to let sterilants reach all surfaces.
Combine proper tool cleaning with effective sterilization methods for the best chance at saving your plants.
Protective Gear Essentials
While pruning damaged or diseased plants might seem like a straightforward task, the right protective gear can make all the difference in preventing injuries and ensuring successful recovery. Choose between glove types-nitrile for chemical resistance, leather for thorns, or disposable for hygiene-to guard against cuts and sap exposure. Don’t forget eye protection; safety goggles meeting ANSI standards block debris and sprays. Layer up with coveralls to shield from irritants, and wear steel-toed boots for extra safety. Remember, proper gear builds confidence as you tackle emergency repairs with care. Equip yourself with bypass pruning shears that offer a 5/8-inch cutting capacity for clean cuts on damaged branches and stems.
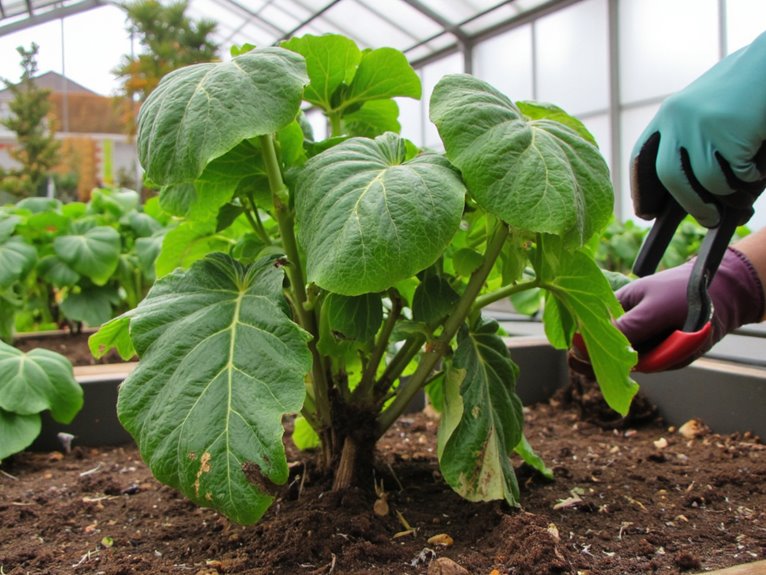
Step-by-Step Technique for Clean Cuttings
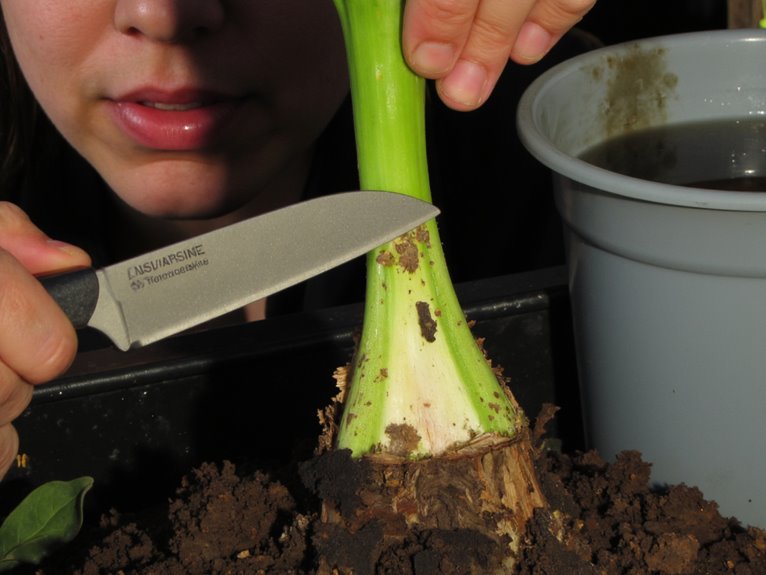
Before you even pick up your tools, take a moment to select the right blade-sharp, sterile, and suited for the job-because the quality of your cut directly impacts how quickly your plant heals.
- Choose #10 or #20 scalpel blades for precision
- Cut at a slight angle to promote water runoff
- Use circumferential cuts to isolate damaged areas
- Make steady motions with consistent pressure
- Keep tools clean and sharp between cuts
Master these cutting techniques to prioritize tissue health. Start by identifying the boundary between healthy and damaged parts. Hold your blade at a 45-degree angle and make one smooth motion rather than sawing back and forth. For thick branches, begin with an undercut to avoid tearing bark. Always work on a clean surface and let cuts dry before applying any sealant. These methods create clean wounds that heal faster and stay infection-free.
How to Identify and Remove Rotted or Necrotic Tissue
Although necrotic tissue may seem uniform at first glance, its appearance often reveals specific clues about its cause-whether it’s the distinct ringspots of viral infections or the sunken cankers typical of bacterial blight. Examine for browning with clear borders, yellowing edges, or dark lesions that signal pathogen activity. When removing, always cut back to healthy tissue, leaving a margin to support plant health and tissue regeneration. Disinfect tools between cuts to prevent spreading infections. Proper removal not only improves aesthetics but also strengthens the plant’s ability to recover. By addressing necrotic areas promptly, you give your plants the best chance at survival and renewed growth.
Dealing With Pest Damage Through Surgical Trimming
- Inspect regularly for early signs like aphid colonies or bark borers
- Make clean cuts near branch collars to aid healing
- Remove suckers and water sprouts that attract sap-suckers
- Use the three-cut method for large branches
- Combine trimming with biological controls for lasting protection
Proper Disposal of Removed Plant Material
Even after careful trimming, you might find that some plant material poses hidden dangers. Identify biohazardous waste like infected or pest-riddled parts that require special handling. Use red or orange biohazard bags for containment, filling them no more than 75% full to guarantee safe sealing. For treatment methods, autoclave contaminated material at high temperatures or disinfect with diluted bleach before disposal. Avoid raw composting without heat treatment to prevent pathogen spread. Dispose of sharp tools in puncture-resistant containers and follow local regulations for biosafety. Proper waste containment and treatment protect both your garden and environment-keeping plants healthy while minimizing risks.
Post-Surgery Care: Watering and Nutrition Guidelines
After carefully removing damaged or diseased parts from your plants, the real work begins with nurturing their recovery. Focus on watering frequency-deep but not soggy waterings help roots heal without rot risks. Start feeding once wounds close, using balanced fertilizers to boost regrowth. Avoid overhead spraying; let foliage dry to prevent infections instead. Water early in the day so plants can use moisture before nightfall. Track nutrient timing closely; too much too soon shocks stressed systems.
- Deep water but keep soil from staying wet
- Feed after healing starts with organic options
- Keep foliage dry to avoid fungal issues
- Adjust based on plant response and growth
- Water consistently according to species needs
Balance is key-neither underwatering nor overfarming will help your green patients fully recover.
Monitoring Recovery From Plant Surgery
After plant surgery, you should watch for gradual changes like reduced swelling and returning color as signs your plants are healing properly. Keep an eye out for stress indicators such as sudden wilting or discoloration that don’t improve within a few days. As recovery progresses, adjust watering schedules and fertilization based on visible improvements while avoiding overhandling the surgical sites.
Signs of Improvement
As you watch your plant heal from surgery, tracking its progress becomes as essential as the procedure itself-much like how we monitor our own recovery. Look for growth indicators such as new green shoots or reduced discoloration, which signal healing is underway. Understanding the recovery timeline helps manage expectations and care routines.
- New leaves or shoots near wounds show tissue regeneration.
- Callus formation seals cut areas effectively.
- No mold or rot on cuts means healthy closure.
- Firmer textures contrast with dry, damaged parts.
- Improved water uptake reduces wilting and droop.
Stay patient as your plant rebuilds itself-one green sign at a time.
Detecting Stress
While your plant may not verbalize its discomfort, recognizing stress signals is essential for successful recovery-much like how we monitor our own health after medical procedures. Detecting physiological stress in plants involves tracking water potential, chlorophyll fluorescence, and ROS accumulation. Biochemical markers like hormonal fluctuations and electrolyte leakage provide critical insights.
| Physiological Indicators | Biochemical Markers |
|---|---|
| Water potential changes | Hormonal fluctuations |
| Chlorophyll fluorescence | ROS accumulation |
| Cell membrane damage | Enzyme activity levels |
Monitor these alongside environmental factors to assess recovery progress effectively.
Care Routine Adjustments
Your plant’s journey to healing after surgery requires thoughtful adjustments to its daily care-just as any living thing needs time to rebuild strength after an injury. Focusing on adjustment strategies for the care routine is essential for a successful recovery.
- Limit physical activity near the surgical site for 3–7 days.
- Adjust watering practices to avoid oversaturation or direct spray on damaged areas.
- Delay fertilization until new growth appears, using diluted solutions initially.
- Create a stable environment with controlled light, temperature, and humidity.
- Monitor regularly for signs of progress or complications, documenting changes.
These adjustments support your plant’s healing process while maintaining its overall health.
Preventing Disease Spread After Emergency Pruning
After an emergency prune, taking steps to prevent disease spread isn’t just important-it’s essential for protecting your plants’ health. Sanitize tools thoroughly between cuts using alcohol or bleach for pathogen control. Wear gloves and change them frequently to prevent infection prevention through hand contact. Dispose of cuttings in sealed bags rather than compost to avoid spreading spores. When dealing with multiple plants, isolate pruned sections with physical barriers. Also, prune during dry weather to reduce disease transmission via water droplets. Remember, your attention to sanitation after emergency pruning directly impacts how well your garden recovers.
Balancing Root and Shoot Systems After Damage Removal
You’re about to explore how plants re-balance themselves after pruning or injury, focusing on hormonal signals that coordinate growth, nutrient priorities that support recovery, and the dynamic interplay between roots and shoots as they regenerate.
When you remove part of a plant, it triggers internal messaging systems – like cytokinins from roots and auxins from shoots – that tell other parts when to grow or hold back, ensuring both systems get what they need.
This balance isn’t static; instead, plants actively adjust resource allocation based on damage, prioritizing growth where it’s most needed while maintaining overall health and resilience.
Hormonal Regulation After Damage
When plants suffer damage, their internal hormonal orchestra springs into action, orchestrating a delicate balance between root and shoot regeneration. Hormonal interplay guides recovery coordination as auxin transport creates directional signals for cell division above wounds while reducing below. Cytokinin signaling opposes auxin to regulate differentiation and stabilize repair sites. Ethylene response intensifies by upregulating genes that drive cell proliferation and activate shared transcription factors with auxin and jasmonic acid. Stress integration guarantees resources flow where they’re most needed, prioritizing damaged areas without compromising the whole plant’s health.
- Auxin forms directional signals for regeneration
- Cytokinin stabilizes repair sites through division control
- Ethylene boosts cell proliferation at wounds
- Hormonal crosstalk coordinates root/shoot balance
- Stress responses direct resource allocation
This hormonal network helps plants rebuild themselves with precision, turning injury into an opportunity for renewal.
Nutrient Allocation Priorities
Following damage, plants don’t just heal-they strategically reallocate nutrients to rebuild what’s needed most. After removing damaged parts, they prioritize root growth through nutrient redistribution, especially under stress. Let’s examine factors shaping these priorities:
| Factor | Root Allocation | Shoot Allocation | Nutrient Focus |
|---|---|---|---|
| Drought | ↑ | ↓ | Water uptake |
| Nitrogen deficiency | ↑↑ | ↓↓ | Protein synthesis |
| Phosphorus scarcity | ↑↑↑ | ↓↓↓ | Energy storage |
| Mycorrhizal fungi | ↔ | ↑ | Symbiotic exchange |
This balancing act guarantees root resilience while supporting new shoot growth. Gardeners should nurture roots first-water deeply, add compost, and avoid over-fertilizing shoots until the plant stabilizes.
Growth Dynamics Recovery
After suffering damage, plants don’t just bounce back-they carefully recalibrate their growth strategy, often sacrificing one system to save the other. Growth dynamics shift as recovery strategies prioritize either root or shoot regeneration based on species-specific priorities and injury severity.
- Fast growers tap deeper into root carbohydrates for quick shoot regrowth
- Auxin signals coordinate resource reallocation between systems
- Carbohydrate storage levels determine recovery resilience
- Environmental conditions influence signal strength and response
- Growth allocation balances temporarily to restore equilibrium
This dynamic shows nature’s remarkable ability to adapt-just like you might re-prioritize your own resources after an unexpected loss. The plant’s quiet determination reminds us that even broken systems can find new paths forward with the right reallocation of energy and focus.
Frequently Asked Questions
What Time of Day Is Best for Emergency Plant Surgery?
You should do emergency plant surgery in the morning when sunlight helps wounds heal better. Avoid evenings – high humidity there can slow recovery and increase infection risk. Morning is best for plants needing urgent care.
How to Handle Mechanical Damage to Stems and Trunks?
Handle stem damage by cleaning wounds with water, removing loose bark carefully, and pruning back to healthy tissue. Let the healing process take over-don’t use sealants. Support damaged stems temporarily if needed. Monitor for signs of stress and act fast to save the plant.
Can Emergency Pruning Help Grafted Plants Recover?
Yes, emergency pruning can help grafted plant recovery by reducing stress on the graft union and encouraging new growth. Proper pruning techniques like making clean cuts and removing only damaged tissue support healing. But it’s risky for less resilient plants-be careful!
Should Young vs. Mature Plants Receive Different Care After Surgery?
Yes, young vs. mature plants should get different care after surgery. Young plant care needs gentle handling and stable conditions, while mature plant recovery focuses on stress management and deep watering.
Are Alcohol Wipes Sufficient for Tool Sterilization?
Yes, alcohol wipes are sufficient for tool sterilization. They’re convenient, less corrosive than bleach, and effective against most plant pathogens when used properly. For plant care, make sure to wipe tools clean before use and replace expired wipes to maintain effectiveness.
On a final note
After your plant has undergone emergency surgery, remember that healing takes time and patience. Keep the area moist but not soggy, offer balanced nutrition slowly, and watch closely for signs of improvement or decline. With careful care and a gentle touch, many plants can recover fully-just as you would after a medical procedure. Stay hopeful, stay informed, and your green friends will thank you for it.